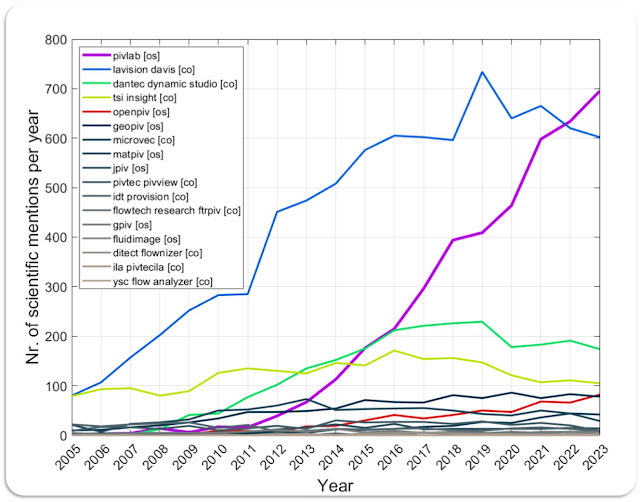
(updated 2024) PIVlab seems to become the most cited PIV software of all available PIV softwares (commercial [co] and open source [os]). I performed a search on Google scholar using all PIV software names that I could think of. The per-year-keyword-occurance might be a good indicator for the popularity of a software in academic research. Steep increase in Keyword occurance for PIVlab (magenta)... These are the search terms I used for Google scholar. I wrote a Matlab script that queries Google scholar for these search terms for each year between 2005 and 2023. Google limits the amount of requests per IP, so I had to use a VPN and change the IP frequently: "lavision" AND "davis" AND ("piv" | "particle image velocimetry") ("pivlab" | "piv lab") AND ("piv" | "particle image velocimetry") -"@pivlab.net" "dantec" AND ("dynamic studio" | "dynamicstudio") AND ("piv...
Welcome wOFV (wavelet-based optical flow velocimetry) to the family of open-source and easy to apply velocimetry algorithms! I released the beta yesterday evening (just before leaving to holidays 😀): Optical flow in PIVlab, see the video above for some comparisons to classical PIV. Download here: https://github.com/Shrediquette/PIVlab/releases Implemented by Bryan E. Schmidt, Gauresh Raj Jassal from Flow Physics and Imaging Laboratory at case.edu and me.
I have just released PIVlab 3.00. There are several changes in the way the graphics are drawn, the way the data is exported and the way it interacts with masks / calibration and region of interest: New graphics: Transparency, masks are transparent, only ROI is opaque Colorbar is now outside the plot for much improved readability Export image data as .mp4 and as .png image Completely new mask handling, allowing much easier mask creation / modification. Mask stay editable all the time. Much easier to create holes in masks Mask operations like shrink/grow/simplify/subdivide/optimize Automatic mask generator, capable of automatic masking of bright areas / dark aread / low-contrast areas. Possibility to add more automatic mask generators in the future Mask import (of user generated masks) heavily improved Matlab Online fully supported New line extraction and area extraction interface: More straightforward and faster. Better interaction Natural file name sorting when importing image fi...